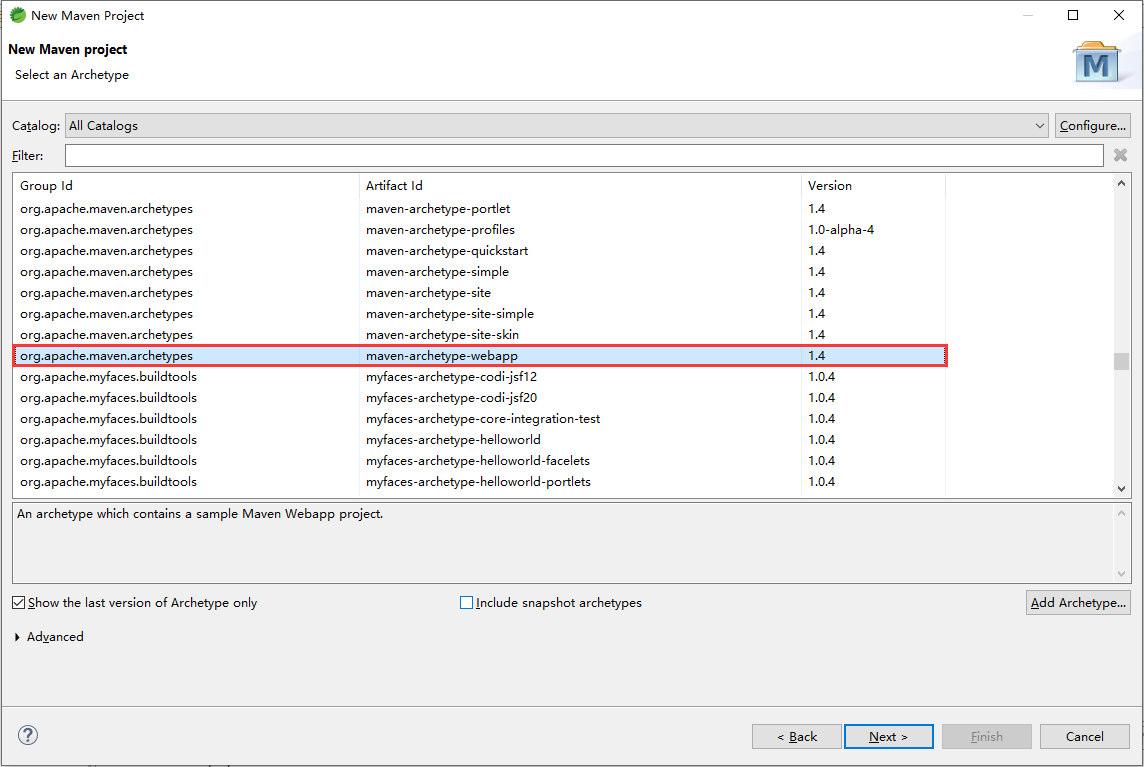
一、Maven创建JavaWeb项目,一般使用:
org.apache.maven.archetypes 的 maven-archetype-webapp:

但是,使用这个创建的JavaWeb应用版本太低,配置相对少,还需要做部分修改,有时候也真创建SimpleMaven应用,再去修改;
不过只要记住一些修改地方,其实也算省事,因为将JavaWeb基本目录已创建。
创建Maven项目说明:
Group Id:组Id,针对一个项目的普遍唯一识别符。是项目组织唯一的标识符,实际对应JAVA的包的结构,是main目录里java的目录结构,相当于我们日常使用的包名,例如:com.xxx.test,最好是填写公司或者组织名称。
Artifact Id:要新建的项目的名字,就是项目的唯一的标识符,实际对应项目的名称,就是项目根目录的名称。
Version:版本号,默认0.0.1-SNAPSHOT
Packing:要将该项目生成什么类型,有jar(普通项目打包),war(Java web项目打包),pom(父工程,被依赖使用,可用作控制版本)
Name:名字,一般和Artifact Id一致即可。
Description:说明
二、经测试,发现一个简单的修改方法,步骤如下:(以下这个方法,能解决Maven的很多报错方法)
1、创建好Maven的JavaWeb项目后,从Tomcat9中复制一个新web.xml文件替换到项目中的老旧web.xml(记住一定要先做这一步)
或者将下面的新web.xml内容,覆盖旧的web.xml内容即可:
<?xml version="1.0" encoding="UTF-8"?>
<web-app xmlns="http://xmlns.jcp.org/xml/ns/javaee" xmlns:xsi="http://www.w3.org/2001/XMLSchema-instance"
  xsi:schemaLocation="http://xmlns.jcp.org/xml/ns/javaee
                      http://xmlns.jcp.org/xml/ns/javaee/web-app_4_0.xsd" version="4.0">
  <display-name>Welcome to Tomcat</display-name>
  <welcome-file-list>
    <welcome-file>index.html</welcome-file>
    <welcome-file>index.htm</welcome-file>
    <welcome-file>index.jsp</welcome-file>
  </welcome-file-list>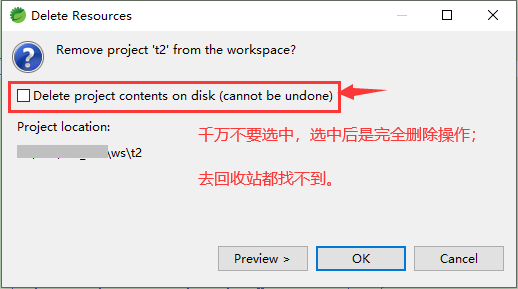
</web-app>2、替换覆盖web.xml后,从Eclipse中删除项目(不要勾选Delete project contents on disk (cannot be undone))
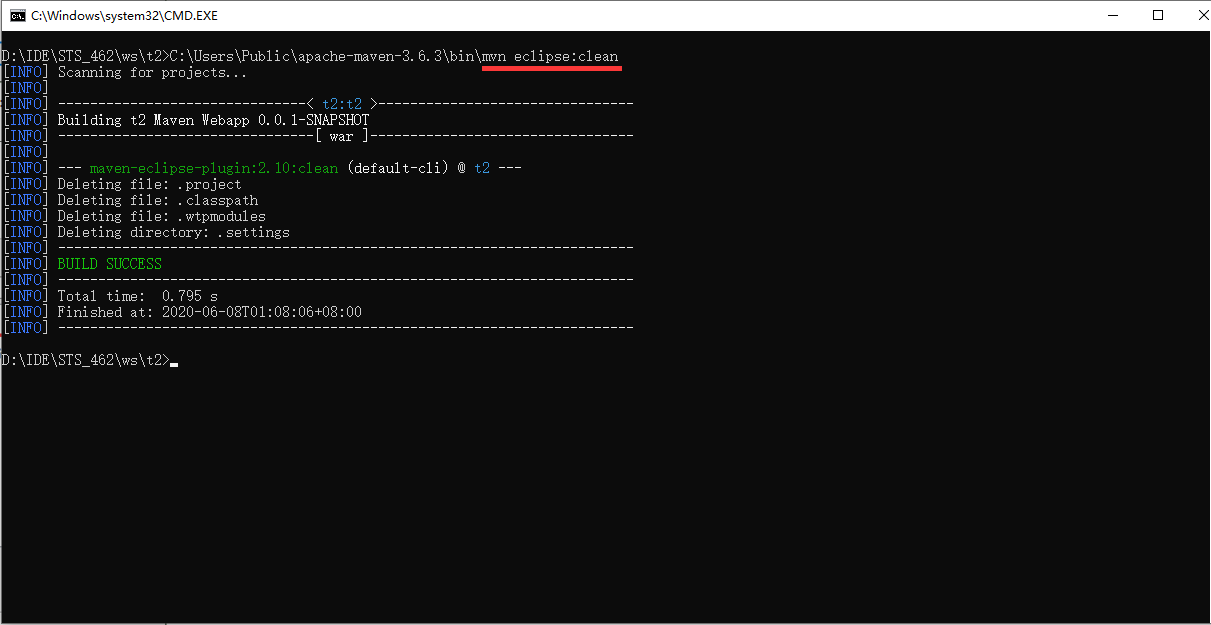
3、命令窗口cmd进入项目根目录,输入命令:mvneclipse:clean 回车(如果mvn没有设置环境变量,则带上全路径,如图所示)
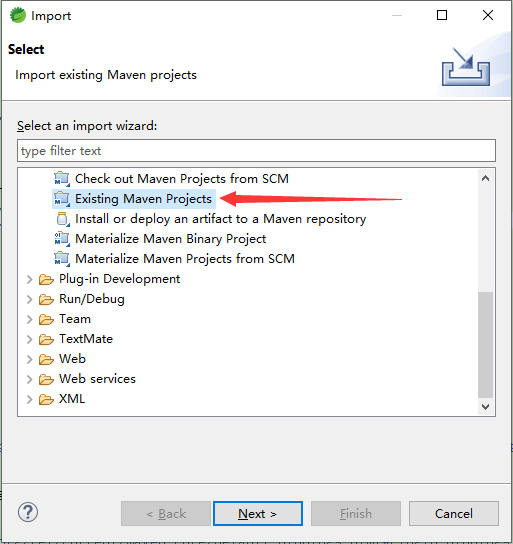
4、重新导入项目 Existing Maven Projects
三、之后还需要我们手动创建几个源文件夹
1、先修改pom.xml,因为是新项目,可以从properties标签开始复制
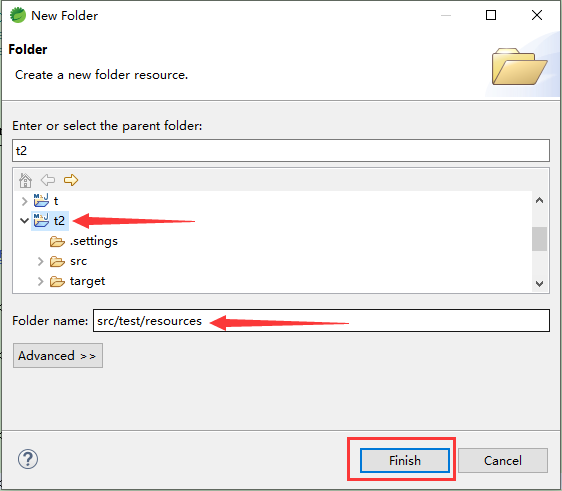
2、选中项目,右键 → New → Folder,新建这几个文件夹:src/main/java、src/main/resources、src/test/java、src/test/resources<?xml version="1.0" encoding="UTF-8"?> <project xmlns="http://maven.apache.org/POM/4.0.0" xmlns:xsi="http://www.w3.org/2001/XMLSchema-instance" xsi:schemaLocation="http://maven.apache.org/POM/4.0.0 http://maven.apache.org/xsd/maven-4.0.0.xsd"> <modelVersion>4.0.0</modelVersion> <groupId>com.testweb</groupId><artifactId>test_maven_web</artifactId> <version>0.0.1-SNAPSHOT</version><packaging>war</packaging> <name>test_maven_web Maven Webapp</name> <!-- FIXME change it to the project's website --> <url>http://www.example.com</url> <properties> <project.build.sourceEncoding>UTF-8</project.build.sourceEncoding> <maven.compiler.source>1.8</maven.compiler.source> <maven.compiler.target>1.8</maven.compiler.target> </properties> <dependencies> <dependency> <groupId>javax.servlet</groupId> <artifactId>javax.servlet-api</artifactId> <version>4.0.1</version> <scope>provided</scope> </dependency> <dependency> <groupId>org.junit.jupiter</groupId> <artifactId>junit-jupiter-api</artifactId> <version>5.6.2</version> <scope>test</scope> </dependency> </dependencies> <build> <!-- 默认源代码和资源文件目录配置,并处理main下无法加载资源配置文件 --> <resources> <resource> <directory>${project.basedir}/src/main/java</directory> <includes> <include>**/*.xml</include> </includes> </resource> <resource> <directory>${project.basedir}/src/main/resources</directory> <includes> <include>**/*.xml</include> <include>**/*.properties</include> </includes> </resource> </resources> <testResources> <testResource><directory>${project.basedir}/src/test/java</directory></testResource> <testResource><directory>${project.basedir}/src/test/resources</directory></testResource> </testResources> <pluginManagement> <plugins> <plugin> <groupId>org.apache.maven.plugins</groupId> <artifactId>maven-compiler-plugin</artifactId> <version>3.8.0</version> <configuration> <source>${maven.compiler.source}</source> <target>${maven.compiler.target}</target> <encoding>${project.build.sourceEncoding}</encoding> <compilerArguments> <verbose /> <bootclasspath>${java.home}/lib/rt.jar;${java.home}/lib/jce.jar</bootclasspath> </compilerArguments> </configuration> </plugin> <plugin><artifactId>maven-clean-plugin</artifactId><version>3.1.0</version></plugin> <plugin><artifactId>maven-resources-plugin</artifactId><version>3.0.2</version></plugin> <plugin><artifactId>maven-compiler-plugin</artifactId><version>3.8.0</version></plugin> <plugin><artifactId>maven-surefire-plugin</artifactId><version>2.22.1</version></plugin> <plugin><artifactId>maven-war-plugin</artifactId><version>3.2.2</version></plugin> <plugin><artifactId>maven-install-plugin</artifactId><version>2.5.2</version></plugin> <plugin><artifactId>maven-deploy-plugin</artifactId><version>2.8.2</version></plugin> </plugins> </pluginManagement> </build> </project>
3、选中项目,右键 → Maven → Update Project...,确定后,Maven会将这四个文件夹自动转换成源文件夹
四、最后添加一个初始必需的依赖,其它的按需添加即可:
<dependency>
  <groupId>javax.servlet</groupId>
  <artifactId>javax.servlet-api</artifactId>
  <version>4.0.1</version>
  <scope>provided</scope>
</dependency>